
When developing a new module in Magento and there’s a need to configure settings for the backend, a system.xml file is required. This file outlines the configuration of our module, enabling administrators to conveniently manage settings within the Magento admin panel.
Creating configuration fields in the Magento backend provides administrators with enhanced flexibility, allowing them to easily adjust various settings. Magento facilitates this by enabling the creation of sections within the configuration menu. This file is situated within etc/adminhtml/system.xml within a designated Commerce 2 extension.
In this article, I’ll demonstrate for custom configuration in magento2 with system.xml, empowering administrators to efficiently manage module settings within the Magento admin interface.
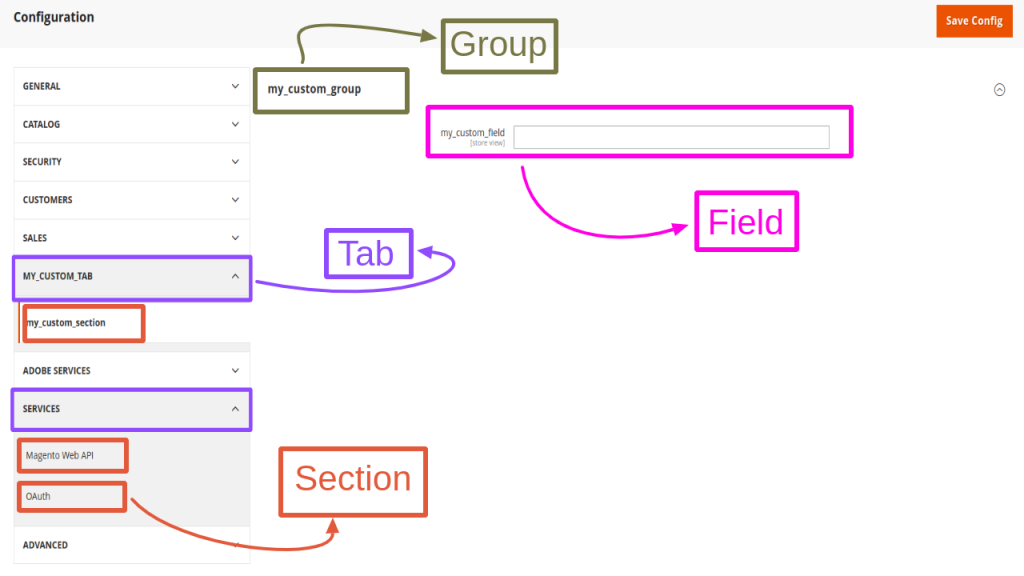
In Magento configuration, there are typically four main components: Tabs, Sections, Groups, and Fields. Tabs are utilized to categorize various configuration areas logically. Each tab can encompass one or more sections, which can also be referred to as submenus. Within a section, there are one or more groups. Each group presents one or more fields, and it can also include a general description for the subsequent fields. Fields, being the smallest unit, are where actual configuration settings are defined within the system configuration context. You may like the Magento 1 article How to create custom configuration fields for magento
<?xml version="1.0" ?>
<config xmlns:xsi="http://www.w3.org/2001/XMLSchema-instance" xsi:noNamespaceSchemaLocation="urn:magento:module:Magento_Config:etc/system_file.xsd">
	<system>
		<tab id="my_custom_tab" translate="label" sortOrder="999">
			<label>my_custom_tab</label>
		</tab>
		<section id="my_custom_section" sortOrder="10" showInWebsite="1" showInStore="1" showInDefault="1" translate="label">
			<label>my_custom_section</label>
			<tab>my_custom_tab</tab>
			<resource>Jrb_DemoModule::config_jrb_demomodule</resource>
			<group id="my_custom_group" sortOrder="10" showInWebsite="1" showInStore="1" showInDefault="1" translate="label">
				<label>my_custom_group</label>
				<field id="my_custom_field" type="text" sortOrder="10" showInWebsite="1" showInStore="1" showInDefault="1" translate="label">
					<label>my_custom_field</label>
					<comment/>
				</field>
			</group>
		</section>
	</system>
</config>
Once all section tabs and fields are declared, it’s necessary to inform and obtain permission for your section to be approved in the Magento backend. This involves declaring access control lists (ACL) in Magento. This below code containe in the file which is situated within etc/acl.xml within a designated Commerce 2 extension.
<?xml version="1.0" ?>
<config xmlns:xsi="http://www.w3.org/2001/XMLSchema-instance" xsi:noNamespaceSchemaLocation="urn:magento:framework:Acl/etc/acl.xsd">
	<acl>
		<resources>
			<resource id="Magento_Backend::admin">
				<resource id="Magento_Backend::stores">
					<resource id="Magento_Backend::stores_settings">
						<resource id="Magento_Config::config">
							<resource id="Jrb_DemoModule::config_jrb_demomodule" title="my_custom_section"/>
						</resource>
					</resource>
				</resource>
			</resource>
		</resources>
	</acl>
</config>
So, this concludes our discussion on custom configuration in magento2 with system.xml. However, it’s essential to delve deeper into understanding how sections work, their functionality, and the significance of each node within them. Let’s explore each aspect one by one.


Pingback:How to create custom configuration fields for magento